


 |
||||||||
|
|
|
|
Click here for High Rise Installation Instructions Warning Non compliance to this warning may result in serious injuries or fatalities. Visually inspect the anchor to ensure that it has not been damaged prior to installation and before each use anchor should not be used in temperatures that exceed 200 degrees Fahrenheit. Avoid damage from corrosive chemicals, open flame, or spark. This products only use is to provide an approved anchor point for workers engaged in acts that require the use of fall protection equipment.
Attention Read fully and understand all instructions before use. To ensure proper use manufacturers instructions must be followed under the supervision of a competent person trained in its installation. The user of Anchor Solutions anchor is reminded that before using this product the member of attachment must be braced, tied and fastened as to provide the required strength and rigidity. ANCHOR SOLUTIONS ANCHOR IS ONE COMPONENT OF A FALL ARREST SYSTEM. THE LOCATION OF ANCHOR POINTS DIFFER DEPENDING ON THE DESIGN OF THE STRUCTURE, THEREFORE TRAINING WILL BE REQUIRED FOR ALL WORKERS TO MEET THE FALL PROTECTION REGULATIONS. AN APPROVED LANYARD OR OTHER RATED DEVICE MUST BE CONNECTED TO THE WORKERS BODYWEAR (APPROVED HARNESS) TO THE INSTALLED ANCHOR. ANCHOR SOLUTIONS ANCHOR IS A NON REUSABLE FALL ARREST ANCHOR. WE ASSUME NO LIABILITY FOR THE REUSE OF THIS PRODUCT. Double wall plate The anchor is made of 2 wide webbing. Each end has been folded over and stitched to itself creating a large loop at one end and a small loop at the other end. The large loop with the warning label passes through the smaller loop as the anchor is wrapped around the member.
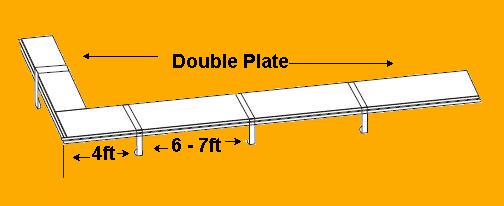
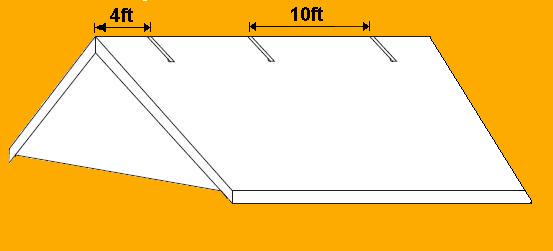
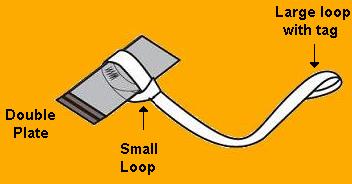 Once the large loop has passed through the small loop, pull the large loop downward to tighten and secure the anchor. No nails are required on a wall plate installation. Anchors installed on the double plate should be placed no more than 4 (four) feet from the corner and 6 (six) feet apart thereafter.
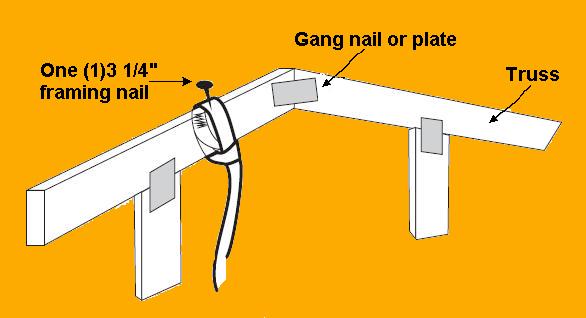
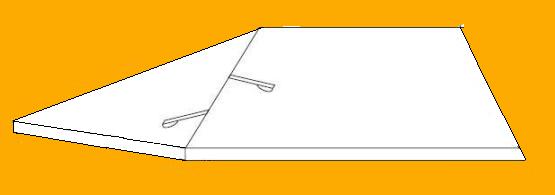
 It is the recommendation of Anchor Solutions that the trusses should be fastened in place before installing anchor on the double plate. Installation of the anchor before the trusses are set could cause damage to the anchor as the trusses are dragged into position. Roof Truss The same procedure is followed for a truss application. The large loop with the warning label passes through the small loop as the anchor is wrapped around the truss. Pull tight to secure. One (1) nail (3 ¼ inch framing nail) should be used to ensure the anchor will not slide out of position on the truss. The nail should be securely driven into the portion of the anchor that passes over the top of the truss. Ensure that the anchor does not come in contact with the trusses gang nail or gang plate.
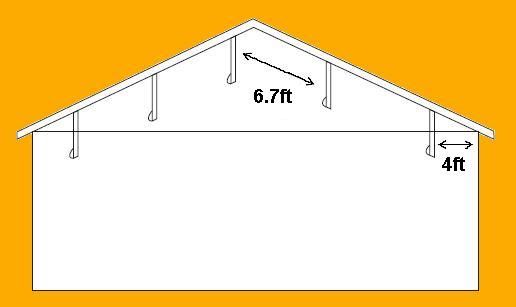
 On gable ends, do not install anchor on the double plate. The anchors should be installed on the gable truss. The anchor at the peak of the gable truss should be installed slightly to the right or the left of dead centre to avoid the gang nail or gang plate. They should be spaced 6 (six) to 7 (seven) feet apart thereafter. The anchor at the lowest portion of the gable truss should be no more that 4 (four) feet from the corner of the structure.
 Roof Truss Continued Anchors installed on the trusses for roof work protection should be no more than 4 (four) feet in from the fascia board and not more than 10 (ten) feet apart thereafter. Do not install anchor on the ridge board spacers in between the trusses.
On roofs with cottage ends anchors may be installed on the hip to provide protection for workers. The same spacing of 10 (ten) feet is required.
On conventional or hand cut roofs anchor may be installed on the hip or ridge board. On trussed roofs anchor must be installed on the truss. Not on the hip or ridge board spacers. Always avoid gang nail or gang plate.
Roof Truss Continued When installing the roof sheathing near the anchor be sure to pull the anchor to the top side of the roof sheathing. This will ensure protection for the trades to follow. The anchor should pass through the area where the roof sheathing meets at the peak and at the hip.
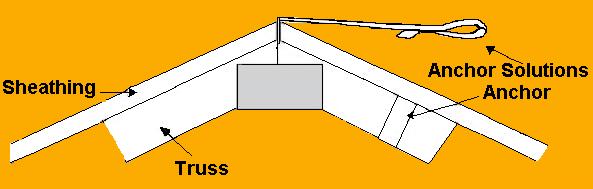 TAKE CAUTION WHEN TRIMMING OFF EXCESS ROOF SHEATHING. DAMAGING THE ANCHOR MAY CAUSE SERIOUS INJURIES OR FATALITIES. We are pleased to offer free onsite training for installation and use of this product. Contact your Anchor Solutions representative for details. The Anchor Solutions company recommends that all exposed portions of the anchor straps be removed before occupancy, but not before the exterior of the structure is complete and or 2 (two) years after its installation. Having no control over the location of the anchor and the weather conditions it may face, we give a 2 (two) year UV rating on this product from the date of installation.
 |
|
||
|
|
||||
| Site Map |